|
| 1. |
Choose the "Control Panel" icon on the "start" menu to display the control panel, and click on "Network and Internet Connections". |
 |
|
|
|
| 2. |
The "Network and Internet Connections" window will appear.Click on "Network Connections". |
 |
|
|
|
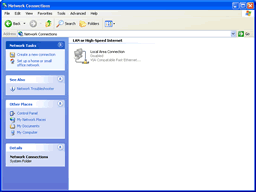
| 3. |
The "Network Connections" window will appear.In "Network Tasks", choose "Create a new connection".
|
 |
|
|
|
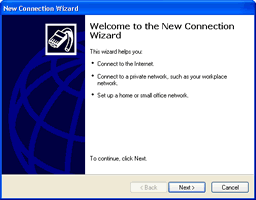
| 4. |
The "New Connection Wizard" window will appear.Click on the "Next" button. |
 |
|
|
|
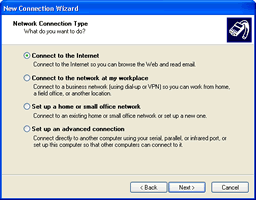
| 5. |
Choose "Connect to the Internet" and click on the "Next" button. |
 |
|
|
|
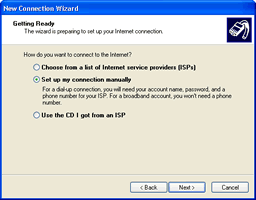
| 6. |
Choose "Set up my connection manually" and click on the "Next" button. |
|
|
|
|
| 7. |
Choose "Connect using a dial-up modem" and click on the "Next" button.
|
 |
|
|
|
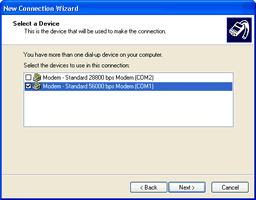
| 8. |
Check the modem you will be using and click on the "Next" button.
* If only one modem has been installed, this window will be skipped.
|
 |
|
|
|
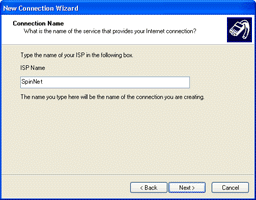
| 9. |
Type "SpinNet" in the "ISP Name" box and click on the "Next" button.
|
 |
|
|
|
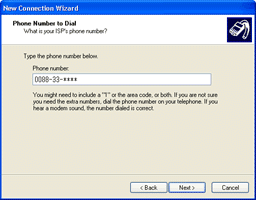
| 10. |
In the "Phone number" box, enter the access point number of the service you will be using, preceded by the area code.Then, click on the "Next" button.
* If you will be using NTT FLET'S ISDN, enter the FLET'S ISDN number provided by NTT.
|
 |
|
|
|
| 11. |
Enter the following and click on the "Next" button. |
|
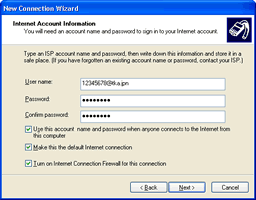 |
User name:
- Connect Login Name
Password:
- Connect Login Password
Confirm password
- Connect Login Password
* The password is case sensitive. |
|
|
|
|
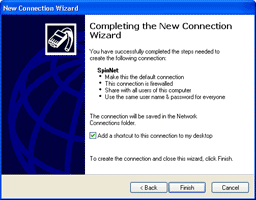
| 12. |
The "Completing the New Connection Wizard" window will appear.Click on the "Finish" button. |
 |
|
|
|
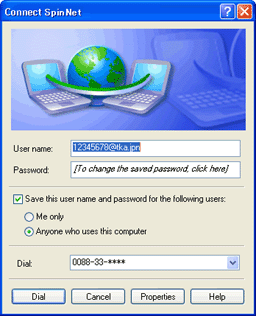
| 13. |
The "Connect SpinNet" window will appear.Confirm that the information has been set as follows.
User name:
- Connect Login Name
Dial:
- Access Point Number
|
|
 |
|
|
|
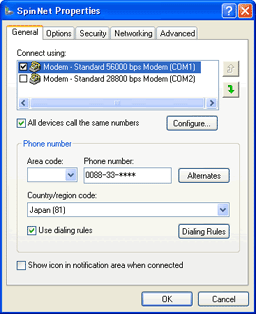
| 14. |
Click on the "Properties" button and the "SpinNet Properties" window will appear.Check "Use dialing rules" and choose "Japan (81)" under "Country/region code".Then click on the "Dialing Rules" button. |
 |
|
|
|
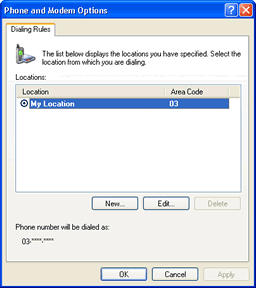
| 15. |
Click on the "Edit" button after choosing "My Location". |
 |
|
|
|
| 16. |
Enter the following.
|
|
|
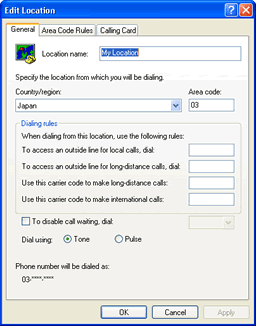 |
Area code:
- Your area code.
Dialing rules
-
Enter information as requested.
* Enter a number when it is necessary to dial for access to an outside line, e.g., in a hotel.
Dial using:
- Choose "Tone" if you will be using a touch-tone or ISDN line, and "Pulse" if you will be using a pulse line.
|
|
|
|
|
| 17. |
Click on the "OK" button to return to the "Phone and Modem Options" window, then click on the "OK" button to return to the "SpinNet Properties" window. |
|
|
|
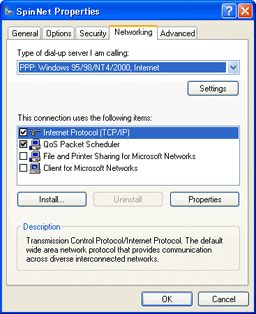
| 18. |
Click on the "Networking" tab and confirm that the information has been set as follows.
|
|
|
Type of dial-up server I am calling:
- PPP:Windows 95/98/NT4/2000,Internet
Internet Protocol (TCP/IP)
- Checked
|
|
|
|
|
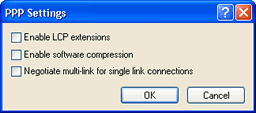
| 19. |
Click on the "Settings" button to display the "PPP Settings" window.
Uncheck all the checkboxes and click on the "OK" button. |
 |
|
|
|
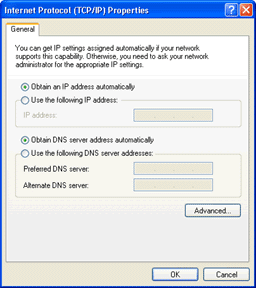
| 20. |
The window will return to the "Networking" tab of the "SpinNet Properties" window.Click on the "Properties" button after choosing "Internet Protocol (TCP/IP)".The "Internet Protocol (TCP/IP) Properties" window will appear.Enter the following.
|
|
|
Obtain an IP address automatically
- Select
Obtain DNS server address automatically:
- Select
|
|
|
|
|
| 21. |
Click on the "OK" button to return to the "SpinNet Properties" window. |
|
|
|
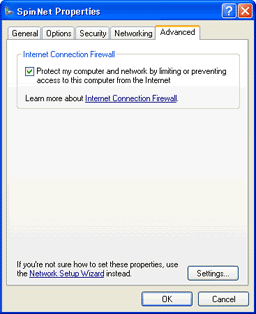
| 22. |
Click on the "Advanced" tab and enter the following.
Protect my computer and network by limiting or preventing access to this computer from the Internet
- Checked
|
|
 |
|
|
|
| 23. |
Click on the "OK" button to close the "SpinNet Properties" window. |
|
|
|
| 24. |
The window will return to "Connect SpinNet".Click on the "Cancel" button to close the window.
The "SpinNet" icon will now appear on the "Network Connections" window. |
 |
|
|
|
| -- Dial-up Connection |
|
|
|
| 1. |
Double-click on the "SpinNet" icon on the "Network Connections" window.
The "Connect SpinNet" window will appear. |
|
|
|
| 2. |
Confirm the user name in the "User name" box, and the access point number in the "Dial" box.
User name:
- Connect Login Name
Dial:
- Access Point Number
|
|
 |
|
|
|
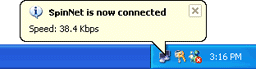
| 3. |
Click on the "Dial" button.
The "Connecting SpinNet" window will appear and the connection attempt will start.
When the connection has been made, "SpinNet is now connected" will be displayed. |
 |
|
|
|