Keep the information below on hand. This information was displayed on your browser when you signed-up for our service, or given in the Quick Reference sheet we send by postal mail with the Access Information Sheet.
You will see the following items written in green letters throughout this manual. Please enter your own information wherever these items appear.
-
User Login Name
-
User Login Password
-
Access Point Number
-
Primary DNS Server
-
Secondary DNS Server
1.
Double-click on the "TCP/IP" icon to open it in the "Control Panels" folder.
2.
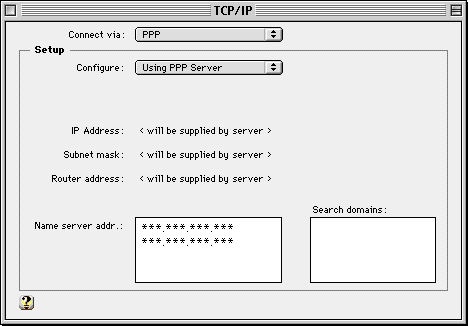
TCP/IP window
Connect via:
Select PPP
Configure:
Select Using PPP Server
Name server addr:
Type your Primary DNS Server and Secondary DNS Server on two separate lines.
3.
Close the "TCP/IP" window. A dialog box appears that asks whether you wish to save the configuration or not. Click "Save".
4.
Open "Modem" in the "Control Panels" folder.
5.
Modem
Connect via:
Select the port to which the modem is connected. (ex. Modem Port.)
Modem:
Select the modem you are using.
Sound:
Select On
Dialing:
Select the line type of your phone line * If you are dialing from a hotel room or office, please check "Ignore dial tone".
6.
Close the "Modem" window. A dialog box appears that asks whether you wish to save the configuration or not. Click "Save".
7.
Open "Remote Access" in the "Control Panels".
8.
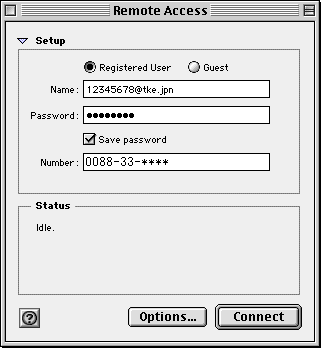
Remote Access Select "Registered User".
Name:
Your User Login Name
Password:
Your User Login Password
* Password when typed will be displayed as "*".
Number:
Your Access Point Number
9.
Click on the "Options" button.
10.
Click on the "Protocol" tab and configure as follows.
Use protocol:
Select PPP
Connect automatically when starting TCP/IP applications:
should be checked.
Allow error correction and compression in modem:
should be checked.
Use TCP header compression:
should be checked.
Connect to a command-line host:
should not be checked.
11.
Click the "OK" button, and then close the "Remote Access" window. A dialog box appears that asks whether you wish to save the configuration or not. Click "Save".
12.
Click on the "Connect" button in the "Remote Access" window. The connection will begin.
The settings for connection to the Internet are now complete. Welcome toSpinNet! Setting Guide for many kinds of software is also available.