| |
|
|
| 2. |
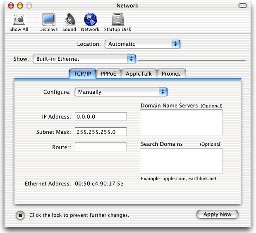
The "Network" window will appear. Set "Location" and "Show" to the values shown below. |
| |

|
Location
- Automatic
Show
- Built-in Ethernet
|
|
| |
|
|
| 3. |
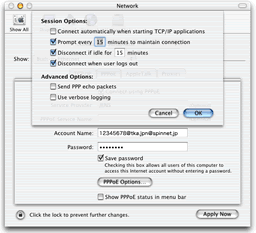
Click on the "PPPoE" tab and set the following items to the values below.
|
| |
|
Connect using PPPoE
- Checked
Service Provider
- SpinNet
Account Name
- Connect Login Name followed by @spinnet.jp
(E.g.: When the Connect Login Name is 12345678@tka.jpn, the account name is 12345678@tka.jpn@spinnet.jp.)
Password
- Connect Login Password (displayed as "
 ") ")
* The password is case sensitive.
Save password
- Checked
|
|
| |
|
|
| 4. |
Click on the "PPPoE Options" button and set the following items to the values below. |
| |

|
Connect automatically when starting TCP/IP applications
- Unchecked
Prompt every [ ] minutes to maintain connection
- Checked
* Change the value of "every [ ] minutes" if needed.
Disconnect if idle for [ ] minutes
- Checked
* Change the value of "for [ ] minutes" if needed.
Disconnect when user logs out
- Checked
Send PPP echo packets
- Unchecked
Use verbose logging
- Unchecked
|
|
| |
|
|
| 5. |
Click on the "OK" button to return to the "Network" window. |
| |
|
|
| 6. |
Click on the "TCP/IP" tab, set "Configure", "Domain Name Servers(Optional)" and "Search Domains(Optional). |
| |
|
Configure
- Using PPP
Domain Name Servers(Optional)
- Blank
Search Domains(Optional)
- Blank
|
|
| |
|
|
| 7. |
Click on the "Proxies" tab and set the following items to unchecked. |
| |
|
FTP Proxy
- Unchecked
Use Passive FTP Mode(PASV)
- Unchecked
Web Proxy(HTTP)
- Unchecked
Secure Web Proxy
- Unchecked
Streaming Proxy(RTSP)
- Unchecked
Gopher Proxy
- Unchecked
SOCKS Firewall
- Unchecked
|
|
| |
|
|
| 8. |
Confirm the entered information and click on the "Apply Now" button to close the "Network" window. |
| |
|
|
| -- Connection Procedure |
| |
|
|
| 1. |
Click on "Finder" in the "Dock" to open the "Finder" window, then click on the "Applications" button in the toolbar.
* If the "Dock" is not displayed, choose "New Finder Window" under the "File" menu to open the "Finder" window. |
|
| |
|
|
| 2. |
The "Applications" window will appear. Double-click on the "Internet Connect" icon. |

|
| |
|
|
| 3. |
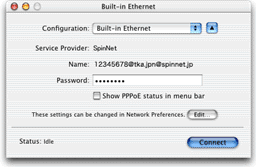
The "Internal Modem" window will appear. Select "Built-in Ethernet" from "Configuration". Verify that the "Name" is correct. |
| |

|
Name
- Connect Login Name followed by @spinnet.jp
(E.g.: 12345678@tka.jpn@spinnet.jp.)
|
|
| |
|
|
| 4. |
Click on the "Connect" button in the "Built-in Ethernet" window. Connection will be attempted. |
| |
|
|
| 5. |
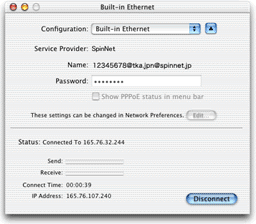
When the connection has been made, the connection state will be shown in "Status". |
 |
| |
|
|