| |
|
|
| 2. |
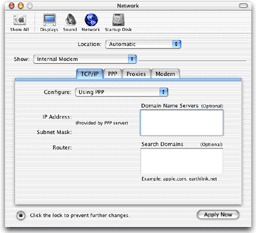
The "Network" window will appear. Set "Location" and "Show" to the values shown below. Then click on the "TCP/IP" tab, set "Configure", "Domain Name Servers(Optional)" and "Search Domains(Optional). |
| |

|
Location
- Automatic
Show
- Internal Modem
Configure
- Using PPP
Domain Name Servers(Optional)
- Blank
Search Domains(Optional)
- Blank
|
|
| |
|
|
| 3. |
Click on the "PPP" tab and set the following items to the values below.
|
| |
|
Service Provider
- SpinNet
Telephone Number
- Access Point Number
* Include the area code.
-
* If you will be using NTT FLET'S ISDN, enter the FLET'S ISDN number provided by NTT.
Account Name
- Connect Login Name
Password
- Connect Login Password (displayed as "
 ") ")
* The password is case sensitive.
Save password
- Checked
|
|
| |
|
|
| 4. |
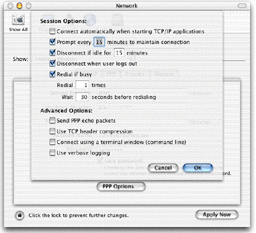
Click on the "PPP Options" button and set the following items to the values below. |
| |

|
Connect automatically when starting TCP/IP applications
- Unchecked
Prompt every [ ] minutes to maintain connection
- Checked
* Change the value of "every [ ] minutes" if needed.
Disconnect if idle for [ ] minutes
- Checked
* Change the value of "for [ ] minutes" if needed.
Disconnect when user logs out
- Checked
Redial if busy
- Checked
* Change the values of "Redial [ ] times" and "Wait [ ] seconds before redialing" if needed.
Send PPP echo packets
- Unchecked
Use TCP header compression
- Unchecked
Connect using a terminal window(command line)
- Unchecked
Use verbose logging
- Unchecked
|
|
| |
|
|
| 5. |
Click on the "OK" button to return to the "Network" window and click on the "Proxies" tab. |
| |
|
|
| 6. |
Set the following items to unchecked. |
| |
|
FTP Proxy
- Unchecked
Use Passive FTP Mode(PASV)
- Unchecked
Web Proxy(HTTP)
- Unchecked
Secure Web Proxy
- Unchecked
Streaming Proxy(RTSP)
- Unchecked
Gopher Proxy
- Unchecked
SOCKS Firewall
- Unchecked
|
|
| |
|
|
| 7. |
Click on the "Modem" tab and set the following items to the values below. |
| |
|
Modem
- Choose the modem you will be using.
Enable error correction and compression in modem
- Checked
Sound
- Choose "On".
Dialing
- Choose "Tone" if you will be using a touch-tone or ISDN line, and "Pulse" if you will be using a pulse line.
Wait for dial tone before dialing
- Checked
* Uncheck the checkbox when it is necessary to dial for access to an outside line, e.g., in a hotel.
|
|
| |
|
|
| 8. |
Confirm the entered information and click on the "Apply Now" button to close the "Network" window. |
| |
|
|
| -- Dial-up Connection |
| |
|
|
| 1. |
Click on "Finder" in the "Dock" to open the "Finder" window, then click on the "Applications" button in the toolbar.
* If the "Dock" is not displayed, choose "New Finder Window" under the "File" menu to open the "Finder" window. |
|
| |
|
|
| 2. |
The "Applications" window will appear. Double-click on the "Internet Connect" icon. |

|
| |
|
|
| 3. |
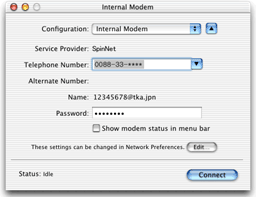
The "Internal Modem" window will appear. Verify that the "Telephone Number" and "Name" are correct. |
| |

|
Telephone Number
- Access Point Number
Name
- Connect Login Name
|
|
| |
|
|
| 4. |
Click on the "Connect" button in the "Internal Modem" window to start dialing. |
| |
|
|
| 5. |
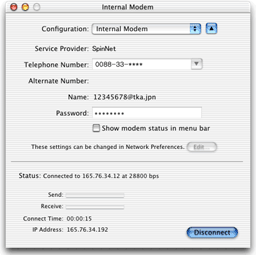
When the connection has been made, the connection state will be shown in "Status". |
 |
| |
|
|